2 posts tagged with "windows"

View All Tags

Windows OpenSSH Server authorized_keys Failure on Administrative User Account

· 2 min read
Huakun Shen
Website Owner

Problem

I run into a problem related to ssh and got stuck for a few days. On a fresh-intsalled win11 PC, I tried to configure OpenSSh server, which I have done a thousand times on Linux OS.

I could ssh into the windows PC, but only using password; Key-based auth (i.e. password-less) doesn't work no matter what I do.

I added the authorized_keys file to C:\Users\username\.ssh, checked the file permission and even created another user account to compare.

None of these fixed the problem, and I couldn't find a good solution from Google or Chat GPT. BTW, Chat GPT keeps giving me Linux-related solutions.

Solution

The solution is actually quite simple. I read the official Doc by microsoft. Key-based authentication (Administrative user).

It turns out, Windows treat admin account differently. On Linux, regular accounts and sudoer accounts both use $HOME/.ssh/authorized_keys to stored trusted public keys.

The reason of my failure was because I was trying to ssh into an admin account.

On Windows, a administrators_authorized_keys should be placed under C:\ProgramData\ssh\. The content of administrators_authorized_keys is exactly the same.

Solution verified to work.

Comment

  • I can't blame Microsoft as this may be a more secure approach, and it's clearly documented in their documentation.
    • But maybe don't hide this at the bottom of the page. Highlight it in the beginning. It's easy to ignore it.
  • However, I don't understand why I can't easily find solution for such a common topic online. One would not search with the "administrative" keyword for such problem. Maybe Windows should give more warning messages and hints when OpenSSH server is installed or when login failed.
  • Furthermore, Chat GPT still has a long way to go.
  • And Google Search, ... hope you don't get completely replaced by some tech like Chat GPT one day.

Good Luck Hacking!

Fix Windows Network Adapter Low Speed

· 3 min read
Huakun Shen
Website Owner

This is a very weird bug. I will describe the scenario first, then the hacky fix.

Scenario

Environment

Description

I built a new PC with Gigabyte Z690 UD AX DDR4. The wifi 6 wireless adapter works fine, reaches 800+Mbps on my gigabit network; but the ethernet connection can only reach ~10Mbps.

This is super weird, the name is Realtek Gaming 2.5GbE Family Controlleras, the ethernet adapter should support 2.5G, and there is nothing wrong with the router.

Debug Process

  • I plugged in a 2.5G usb C ethernet converter, it worked fine.
  • When I use Ubuntu, the ethernet works fine (reach 900+Mbps).

From this debugging process, we know that the hardware should be fine. The problem most likely comes from Windows, or compatibility issue between windows and the network adapter (driver).

Solution

V1

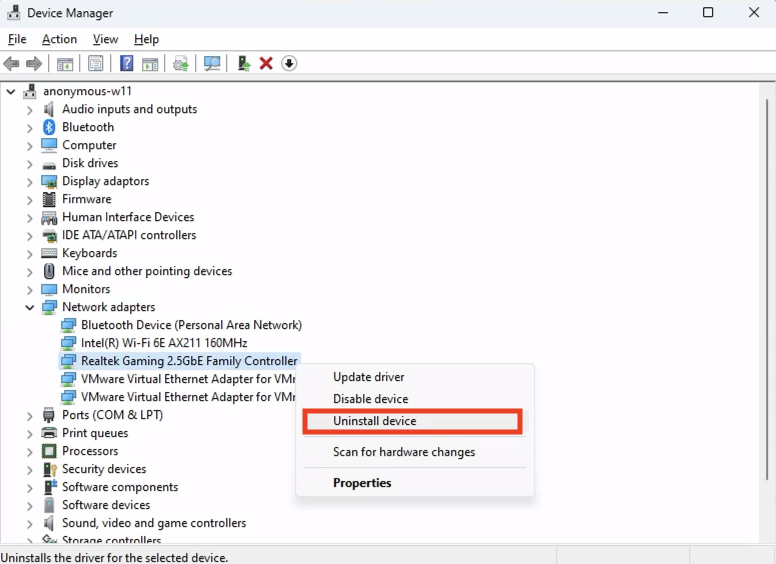
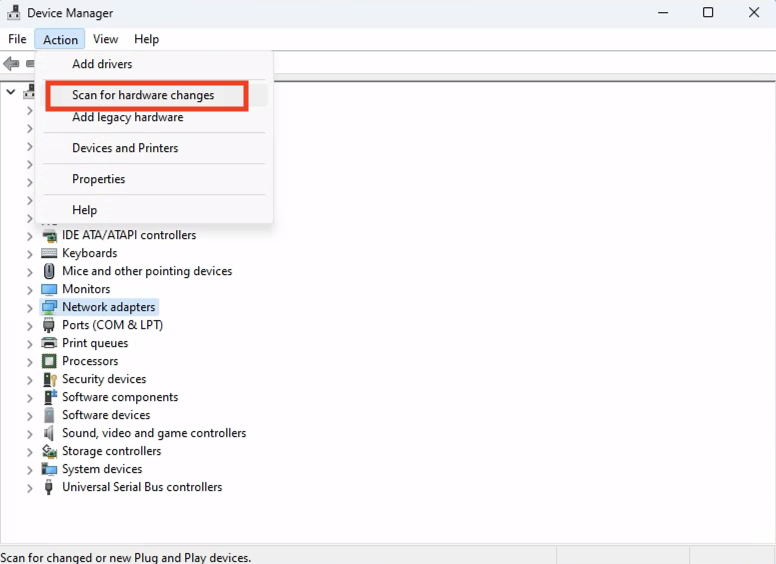
The first time I got it working is by opening "Device", uninstall the device, and reinstall it.

After scanning, the network adapter is back, and the network speed is fixed (900+Mbps).

But this process has to be done every time a computer is booted.

V2 (auto)

This powershell script basically automate the previous solution using powershell.

caution

It requires Adminitrator permission to run the script.

Running this manually everytime is not better than the previous solution, we have to auto-run it on system starts.

The commented out lines is for debugging purpose, to see if the script has really run.

caution

Edit the following script to fit your scenario.

e.g. Update the deviceName, and log path.

# echo "start" | Out-File -Append C:\Users\user\Desktop\debug.log
# date | Out-File -Append C:\Users\user\Desktop\debug.log
# Start-Sleep -Seconds 5
$deviceName="Realtek Gaming 2.5GbE Family Controller"
foreach ($dev in (Get-PnpDevice | Where-Object{$_.Name -eq $deviceName})) {
&"pnputil" /remove-device $dev.InstanceId
}
pnputil /scan-devices
# echo "finish" | Out-File -Append C:\Users\user\Desktop\debug.log
  1. Press Win key, search and open "Task Scheduler"
  2. Action -> Create Basic Task Wizard
  3. Give a name
  4. Use "When I log on" for Trigger
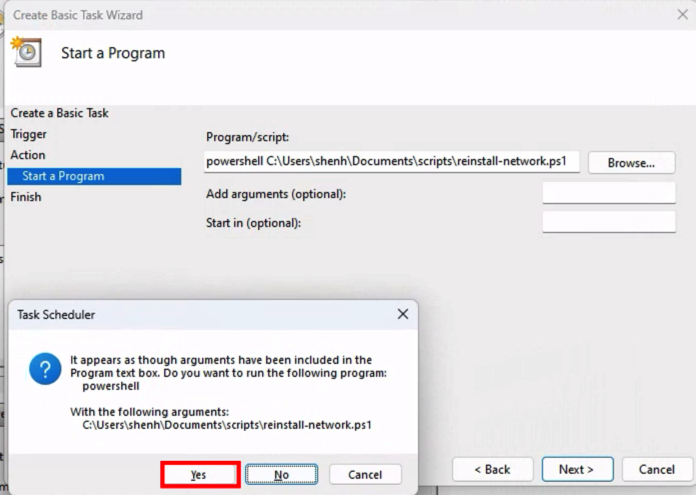
  5. Action should be "Start a program", then fill in the script path
    1. Enter powershell <script-path>
  6. Then Finish
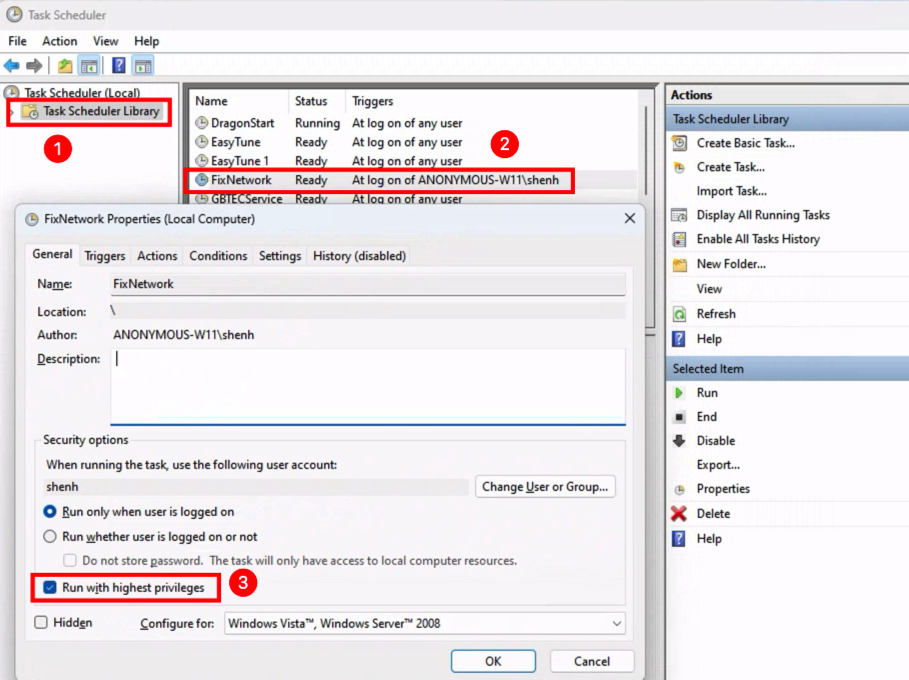
  7. Go to Task Scheduler Library -> Your Task, check Run with highest priviledges

Restart the computer, it should now be fixed.

If it doesn't, you may need to debug.

  1. Check the variables in script
  2. Run the script in powershell as Administrator and see if the network speed is normal.
  3. Then restart and see
  4. If it still doesn't work, uncomment the commented out code to see if the code has really run
  5. If it still doesn't work, then I don't know, good luck
Blame

Microsoft, Realtek, and Gigabyte, I don't know which of you should be responsible for this bug, but this needs to be fixed.

A gaming motherboard can't game at 10Mbps!

I personally believe Microsft/Windows should take the blame, as it works fine on Ubuntu and the driver itself should be fine. Reinstalling the device fixes the problem could induce that a wrong driver is used (override the correct driver).

This solution is hacky and inelegant, but I can't find a better solution online.

Come on, Microsoft.